Monday, June 28, 2010

To Do Chart & 10 in 10

Today is the half way point in the 10 Tasks in 10 days challenge, so it's time for an update. So far, I've done half the tasks on my list. Yay! Here is the dry erase task chart that I made.


In the left panel I put a list of weekly chores, in the bottom monthly chores, and I left the right side open for special projects. The lists are under the glass, so I can cross them off with dry erase markers as they are completed.

Cost:  Free!

The frame came from a box of frames I got off freecycle, and the paper and ribbon was in my sister's ginormous scrapbooking stash that she let me raid. The dry erase markers I already had.


Pool filter: check!  Cost: free! I used epoxy that I already had in my art stash


Scrub caps: check! Cost: about $1 each

Gates cleaned: check! Cost: free! I got this one off of freecycle, and the other was already here at the house.

Friday, June 25, 2010

Scrub Caps

I couldn't sleep last night, so I pumped out 3 scrub caps (aka sweat headband thingies) for my husband. He wanted them to wear while he's at work (in a hot kitchen) and working out. Sure, I could have just bought them, but 1.I'm cheap and 2.He's got a huge head. I mean HUGE. We weighed his head once (I know, we're weird), and it weighed in at a whopping 13 lbs! Doesn't the average head only weigh 8 lbs? I digress...

Anyway, I couldn't find any free patterns online, and even if I did find one it would have been too small, so I just made my own through trial and error and a lot of newspaper. The most successful pattern is this one (folded in 1/2).

A little hard to see? How's this?
 
For fabric I cut up a 3x moisture-wicking t-shirt that was bogo. I made 3 from the one shirt, but could probably squeeze out a fourth.


Did I mention that my wonderful, fancy Brother sewing machine is broken right now? It makes me very very sad. I had to use this machine (known as "the work horse") instead. No fancy stitches here. I'm lucky if I get straight stitches. We have 3 machines in this house and this is the only working one at the moment. Sigh It is a beautiful machine though, the shape of the top reminds me of an old farm tractor. Oh right...back to the scrub caps. Once I got the pattern figured out it was just a matter of pinning, hemming, then sewing the pieces together.
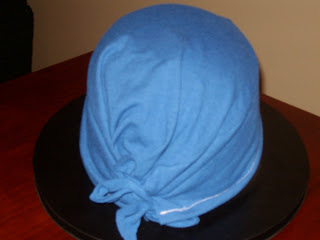
Voila! My model has a normal sized head, so I had to tie it tighter than it would be on my husband, so you can't see how it is longer in the back than front.

Back view. He says they are exactly what he wanted. :) Yay!

Cost of scrub cap online ~$8 each
Cost of making it myself ~$1 each

Wednesday, June 23, 2010

Ten Tasks in Ten Days Challenge

Gina over at The Shabby Chic Cottage is hosting a 'Ten Tasks in Ten Days Challenge' starting tomorrow. Here's the idea behind it: "Find ten tasks that need to be finished, and complete them in ten days. It's a steep challenge - but if you need a kick to break through procrastinating it's a GREAT way to get going. "

If you know me at all, then you know that procrastination is my downfall. Here's hoping the Ten in Ten Challenge will give me a little jump start. Here is my list:

1. Patch the pool filter
2. Make a chore chart
3. Make 3 scrub caps
4. Put away infant stuff
5. Wash and put up baby gates
6. clean out fridge
7. clean off dressers
8. catch up on laundry
9. clean baby's room
10. build & install clothes line


Once I started my list, I couldn't just stop at 10, no no no, I came up with 50 tasks that need to get done. Eeep! I think I need a personal assistant. Ha.

What are ten things you need to get done?

Sunday, June 20, 2010

Stenciled Shirt

I wanted to make a cute custom shirt for my hubby for Father's Day, but one that he would actually wear. Enter the wonderful art of freezer paper stenciling!


I think I did pretty good for my first attempt. I didn't realize until this morning that "Daddy" is crooked. Woops! Well, perfection is in the imperfections, right?

Linked up to:
Father's Day Show & Tell @


"Autographed" Baseball

My husband is a big sports memorabilia collector, and he loves baseball memorabilia especially. So, for Father's Day, one of the gifts the wee one and I made for Daddy was this:

A baseball "autographed" by my husband's biggest fan. I took the hand print during nap time using acrylic paint, then wrote my son's name and date underneath. I'm pretty sure my husband loves it! I may be biased, but I think it's the best autographed baseball in his collection.
Happy Father's Day Baby!

                                                                           Then:                                                                                 

and Now:
Joining:


Photobucket


Thursday, June 17, 2010

Thirsties Duo Diaper Giveaway!

Mama to 3 Blessings is hosting a Thirsties Duo Diaper Giveaway! Check it out here!

Tuesday, June 15, 2010

Artisan Bread in 5 Minutes

I stumbled upon the website Man Made DIY which led me to this recipe here.  It sounded doable, even though I've never made bread from scratch before. I like that you make a big batch and can keep it in the fridge for a week, baking fresh bread as you need it. It turned out great.

Mmmm hot and fresh!

Artisan Bread     Adapted from ”Artisan Bread in Five Minutes a Day,” by Jeff Hertzberg and Zoë François

•1 1/2 tablespoons yeast
•1 1/2 tablespoons salt
•3 cups water
•6 1/2 cups unbleached, all-purpose flour, more for dusting dough (*you can replace about 1 to 1 1/2 cups of white flour with any whole grain flour with great results).
•Cornmeal

1. In a large bowl, mix yeast and salt into 3 cups warm water. Add flour, and stir to combine completely. Let dough rise in a warm place for at least two hours, until it rises and collapses (up to 5 hours - or even overnight won’t hurt it). The dough may be baked at this point, or refrigerated for later use.

I mixed it in a gallon ice cream tub with a hole poked in the lid.

After 2 hours of rising, covered on the counter. I refrigerated it over night and baked the next day.

2. Cover dough, but make sure it is not airtight - gases need to escape - and place in fridge. When you are ready to use it, throw a small fistful of flour on the surface and use a serrated knife to cut off a piece of the size you desire. (The authors recommend a 1 pound loaf - which means cutting off grapefruit-sized piece of dough). Turning the dough in your hands, stretch the surface of the dough and tuck in under. The surface will be smooth, and the bottom with be bunched.

16 oz. of dough. Silly me, I forgot to dust the parchment paper with flour, so it stuck. Woops!


3. Dust a pizza peel (or any flat surface - I use a rimless cookie sheet) with cornmeal. (This prevents sticking, and adds a nice, rustic crunch. You can use flour instead, but you’ll need to use a very generous dusting). Allow dough to rest in a warm place for 40 minutes - longer (up to an hour and a half) if you use some whole wheat flour in place of the white, or if you make a larger loaf.

4. Twenty minutes before baking, preheat oven to 450 degrees with baking stone (or overturned baking sheet) inside on the middle rack, plus a shallow pan on the top rack. Throw a small fistful of flour over the dough, slash it 2-4 times with a serrated knife (in a cross, a tic-tac-toe, or a fan), and slide it into the oven, onto the baking stone. Throw 1-2 cups of tap water into the shallow pan, and quickly shut the oven door to trap steam inside. Bake for 30 minutes, or until crust is well browned and bread sounds hollow when you knock on the bottom.


Yum! I only let mine rest for 40 minutes, so it was very dense. The next batch I will let rest for an hour or more so it's more airy. It was a great, crusty addition to the chicken parm. my husband made for dinner. Mmm! Even the Wee One liked gnawing on it. :)

The Man Made DIY instructions recommended taking it off of the parchment paper after baking for 20 mins. so the bottom would crust up, then bake the remaining 10 mins. I did it, and it worked well. Also, it recommended, letting it cool completely before cutting into it, or the inside will get gummy.

Linked up to:


Photobucket

Sunday, June 13, 2010

Oh Baking Soda, How I love you!

Earlier this year, I posted here about my new love for going shampoo free in favor of baking soda and apple cider vinegar. It has been about 2 months, and I'm still a big fan. My hair is looking and feeling great, and seems to be growing faster.

Now onto my skin care. I have been using Proactive Renewing Cleanser or Deep Cleansing Wash on my face for years, and I really like it, but it's pricey at $20 for a small bottle that lasts me about 2 months. Since I ran out, I started using plain baking soda instead. I figured, if it cleans my hair then why not my face too? It is working great to keep acne at bay. I'm not the first to think of this, but it's new to me. :)

Just wet your face, then rub a big pinch (about 1/4 t.) of baking soda all over your face, concentrating on any oily areas. Either rinse it off right away for normal cleaning, or keep it on as a mask for more of a deep clean and acne treatment. My husband has started using it too since going back to work in a kitchen, and it seems to really help minimize the inevitable breakouts.

Price comparison:
Proactive scrub:  $20/60 portions =  $.3333
Baking Soda:  $.70/403 (1/4 t.) portions = $.0017

Thursday, June 10, 2010

Where should we go next?

Just  this past weekend, while garage sale-ing (saling? sailing?), I commented to my husband that we really need to buy a local map to make garage sailing easier. VZ Navigator is awesome, but it doesn't help much when it comes to mapping out sales. Well, what do I stumble upon this week (I can't remember whose blog, I'm sorry!), but an awesome tool that not only maps garage sales for you, but also searches craigslist, maps a route, and allows you to plug in sales from other sources. Awesome! Check out Yard Sale Treasure Map here, and if you'd like more detailed how-to instructions then check out About.com's How To for step-by-step instructions. Enjoy, and happy garage sailing!

Wednesday, June 9, 2010

Baby stuff you "Need"

When I was preparing for our wee one, people would ask me what we still needed. I would run down the list of stuff we already had, at a loss for what more we could possibly need for this little person. Clothes, diapers, a place to sleep, a way to transport him, hold him, keep him warm, what else is there, really? Well, there's tons if you buy into all the consumerism.

I just stumbled upon a list of "Must Haves" for your child's first year. The list had nearly 80 items on it! Really? You know that this little person spends the majority of it's first year eating, sleeping, and pooing, right? Naturally, I felt compelled to compile my own minimalist list.

It goes without saying that your baby will need a variety of clothes to wear. I'm not going to list everything that you might want to get for him or her to wear, just the specific items that I think are handy for infants.

Clothes: socks, anti-scratch mittens, onesies, gowns, sleep 'n' play outfits

Eating: Mesh feeder, rubber/plastic spoons, bottles, pump, breast pads, nursing bras, bibs, burp cloths, high chair/booster seat, Gripe Water


Travel: Car seat, stroller or a wrap/sling, bag, changing pad

Bath: Tub, nail clippers, soft hair brush, gum/tooth brush, baby wash

Potty: Diapers, wipes, powder, rash ointment, potty chair

Toys: Teething toys, swing, bouncy chair, hanging toys, ball, sensory blocks, books, mirror toy, Bumbo chair

Bed: Crib, sheets, blankets, noise machine, swaddler, *angel care monitor/movement sensor*

Safety: gate, outlet plugs, thermometer, infant motrin, first aid kit, snot sucker

*My one real indulgence on the list is the angel care monitor and movement sensor. Truth be told, it's not a necessity at all, but it gave us great peace of mind when our wee one finally came home from the hospital. If he ever stopped breathing, we would know right away- and he did. Twice, in my arms.  We wouldn't have been able to sleep nearly as well if we hadn't had this monitor. (No, they aren't paying me to say this, but if the makers of Angel Care would like to, I'd be more than happy to accept payment! haha)

That's all that I think you really need for baby's first year. You don't need special towels or washcloths, normal ones work just fine. You don't need shoes for your baby (hello, they aren't walking!), or fancy toys (he's going to be more interested in the newspaper, empty box, and shiny formula can anyway), nursing cover (just use a light blanket), or fancy Moby wrap (you can make the same thing without sewing for about $15 worth of fabric). Many of these items could be hand-me-downs or used if you're on a budget, and some of them the hospital will give you (assuming you have a hospital birth).

Tuesday, June 8, 2010

Country Kids

I stumbled upon a blog that got me thinking about my childhood raised on a farm. I was inspired by Urban Farmgirl (who is having an awesome Pottery Barn Giveaway this week by the way...check it out!) to share some of those experiences. Perhaps it will even be a weekly feature? I know, it's more fun for me than for you, but  indulge me, won't you?

My brother and sister with their new lambs

It occurred to me last night that I never see any of the neighbors here in the suburbs outside in their yards, except maybe to mow the lawn. There are swing sets and tree houses that go untouched. How is it possible? Doesn't anyone spend time outside anymore? Growing up, in the summer we were always outside. It seems like we were outside from dawn to dusk in the summer. There were animals to play with, frogs to catch, eggs to collect, forts to build, raspberries to pick, hide and seek to play, bikes to ride, flowers to pick. The list goes on.

Another brother with pigs

I grew up in upstate New York on an animal farm. On two sides of our property were streams that ran to a pond in the corner. Every summer my older brother and I would be outside catching tadpoles and frogs during the summer. We'd put them all in a bucket and see how many we could collect. I'm sure we would let them go eventually, but I seem to remember the cats getting their fair share of frog legs for dinner.

Another brother with new kittens

We used to have this huge barn that seemed to be a hundred years old, and it was the most awesome barn ever! It had three levels; in the bottom level were the animal's stalls, the 2nd level housed the hay with a hay shoot going down to the horse stall below (a pretty scary make-shift slide for courageous kids), and then there was a storage room that had a loft-type area above it that was a third level. I seem to remember that loft was very unstable and dangerous. I don't know if it really was, or if my siblings just told me that to keep me off of it. I don’t think I ever went up there, but I seem to remember my brothers climbing up there and swinging off of it on the rope swing. That’s right, we had rope swings in that old barn! After the hay was delivered and stacked up, my brothers would rearrange it into forts and stacks and swing from one pile of hay to another. Ever play man hunt in a barn full of piles and piles of hay? We did, it was a blast!

When I was about 8 years old we had a big ice storm. The power was out for a week, we camped out in the living room and ate canned food cooked over our wood burning stove. Among all the damage to trees, buildings, and power lines, was our big old barn, whose roof caved in under all the ice and snow. It was a sad day. At some point after that, the fire department came over and burned down our big old wood barn for us. It was a sad day when we no longer had that barn to play in. The new metal one just didn't compare.

Saturday, June 5, 2010

Easy Peasy Seat Belt Covers

Sorry for my absence (not that anyone noticed it but me), life has a way of trumping blogging.

I haven't spent much time crafting or sewing this week. My most recent project was seat belt covers for the little man's carseat. The straps tend to dig into his neck, and it looks mighty uncomfortable, so these were my solution.
My, how serious he looks!

I used one of the million receiving blankets we have as the fabric. They are very simple, but effective. I didn't use any batting between the flannel layers because I didn't want them to be too puffy and hot, but I should have I think. This doesn't provide any cushion on his shoulders, just a softer, more comfortable fabric against his skin. I didn't take any pics of the process because they were so easy they only took about 15-20 mins from start to finish. Here are my steps though:
1. measure the width of the belt, triple that number then add your seam allowance
2. trace a bowl about the size you need to get a perfect circle
3. cut out 4 of these circles
4. pin and sew two circles together with right sides facing in, leaving an opening to turn right-side-out
5. turn then topstitch, I used a zig zag stitch
6. fold into thirds to figure out where you want the velcro, then sew it in place.
Voila! Easy peasy seatbelt covers!

If I were to add batting then I would just layer the fabric and batting how I intended the final product to look (right side out), hem around the edges, then sew two seams up each circle 1/3 of the way in from the edge (to keep the batting from bunching, and to make it easier to fold in thirds), then add double bias tape around the edges for a neat look. You could use the same technique for regular size seat belts as well.

In fact, I think I might do this when I get my sewing machine fixed. Oh, speaking of which...my machine is broken!  :( Somehow my bobbin case twisted out of place, it jammed up, broke a needle, and a tiny (but important)  piece of the case broke off. Boooooo! Do you know how expensive those are? Almost $50! Holy cow! It's going to have to wait.

Now, for the big news! I am happy to announce that the wee one is now sleeping in his own crib! Today is day 3 of him sleeping there, and I'm shocked to say that it was a short transition. He cried for about 50 minutes the first time I put him there to nap (it was torture for me, and I checked on him every 10-15 minutes of course), and ever since he is just fine! I lay him down and he actually sleeps!
 ::Cue the chorus of angels singing::
Who'da thunk it?

Linked up to the following parties:


Funky Junk's Saturday Nite Special

Wednesday, June 2, 2010

Cloth Blocks


Please excuse my tardiness, but I wanted to show off the cloth taggie blocks I made the wee one for Easter. It was my first sewing project in a few years, so they're far from perfect, but I don't think he minds. One has jingle bells, one rattles, and one crinkles.