Showing posts with label sewing. Show all posts

Wednesday, November 14, 2012

Pants Upcycle

My husband came home from work last week with a lovely rip in the crotch of his Dockers. I couldn't repair them because of where the tear was, so I threw them away. 

Wait!

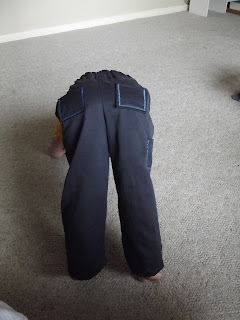
I remembered that I have a sewing machine, and a toddler that could use more pants, so out of the garbage they came. I used the same concept from this post, and in less than an hour, the wee one had a new pair of pants.

I bribed him with a balloon and candy to try to get him to stand still for a picture.

Clearly, it didn't work.

For these pants I used the thigh areas of the ripped adult pants (because there was little wear to the fabric there), and instead of a cuff, I hemmed the bottom. I also added two pockets to the back, and one on the side of each leg. Save yourself some grief, and remember to sew the pockets on before you assemble the pants!


They are a bit boring, so I used brighter blue thread around the pockets to add some interest.


Apparently they're comfy play pants, and have plenty of pockets for treasures.

Cost: Free 

I used up-cycled fabric, and left-over thread and elastic from previous projects.


Sunday, March 6, 2011

Quiet Book Pages #4

It's that time again.

'R' page has a Rocket that slides to the moon and there are 20 stars to count. This page was inspired by Homemade By Jill

'D' page has a buckle and a leash clip thingy to practice with. Inspired by Made By Me. Shared With You.

'B' Page is pretty self explanatory. My idea, though I'm sure it's been done before.

Every quiet book needs an owl, right? The owl's face was inspired by BoutiqueID's ipad sleeve

This part is all me though. Two baby owl finger puppets huddle under Mama Owl's wings. The finger puppets snap on to Mama's body when done playing.

Yup, it's an igloo.

An igloo puzzle that is. This was my idea. I skipped the velcro on this page since the felt sticks together pretty well.

There you go, 5 more pages. Some of the fabrics, the buckles, and belts were upcycled.  Are you sick of quiet book pages yet? I'm getting there myself. Only 9 or so more pages to create.


I partied at:


Wednesday, March 2, 2011

No-Cost Dryer Balls

Edit: In case you're wondering 'What the heck are dryer balls, and why would I want them?', here's why:
Dryer balls bounce around inside the dryer and move your laundry around so that more air can circulate around the clothes, which makes them dry faster. Faster drying means less waiting around in your underwear for those pants to dry, and of course less money you have to shell out to the energy company. Some dryer
balls also make your clothes smell nice. If you wanted you could add a drop or two of essential oil to one of the middle layers of the ball (while you're still making it) and the scent would release over time. Dryer balls are also supposed to make your clothes softer. I have noticed my husband's t-shirts are much softer, and all my laundry is definitely fluffier!

Do you use dryer balls? I've been wanting to try them out, but until recently I was under the impression that dryer balls had to be made of either rubber or wool. I started making a dryer ball out of wool yarn, but it took up so much yarn and it felt like a waste, so I came up with these up-cycled sock dryer balls.
Everyone has lone socks hanging around their house, so why not make them earn their keep?


For the core you can ball fabric scraps together tightly, or tie a knot in the toe of a sock.

Wrap as much fabric scraps as you have around the core as tightly as you can, then put into the toe of your first sock.

Push the core all the way down, stretching the sock, then twist tightly around one full turn- I know my twist is loose here. Do what I say, not what I do. ;)

Flip the remaining sock up around the ball, pull the sock tight, and it will look like this. At this point the sock is 2-ply. Clear as mud, right?  Repeat the twist, pull the sock over, twist, etc. until you reach the top of the sock.

Fold/stretch the top of the sock over like a little hat, and insert into the next sock, "hat" down so it stays put.


You'll know you're done adding socks when it's about the size of a baseball/fist. To finish, pull the top layer tight and sew a quick whip stitch around the edge to keep it together. All done! Throw them in the dryer with your next load, and watch your clothes dry in less time.

You lookin' at me?

Tips:
*Notice I put the ugly hospital socks in the inside and the more decorated frog sock on the outside.
*You could use pretty much any fabric for these. If you had an old t-shirt you could cut it into strips and wrap it into a good size ball then use one sock on the outside to finish. Use what you have!
*Keep it tight. A loose ball won't bounce around and do the job like a hard one will.
* Don't worry about the lumps and bumps. They will actually help the ball to bounce around more erratically, thereby creating more movement and more efficiency.


I read that 4 dryer balls are optimal to save energy, so that's how many I made. I tested them out, and they work awesome! Usually I run a 60 minute dryer cycle with my ancient dryer, and I was able to decrease the time down to 45 minutes with a load of towels. Awesome, right? I tested them with king size sheets also, and I didn't have to pull out and re-arrange the sheets toward the end to get them completely dry. Do your sheets do that? Get all wrapped up around themselves so the inside layers are damp and the outside dry? No longer a problem.

Cost: Nada.
Savings: No idea!

If you use a laundromat that gives you 7 mins of dryer time per quarter then you could save $1 with every two dryer loads. That would add up quick at my house. I'd love to hear if you try this out.

Friday, February 18, 2011

More Quiet Book Pages!


Round 2 of quiet book pages!


Boys need to know how to braid too, right? My husband said no, but I assured him that if  trapped on a deserted island, he would need to know how to braid rope. Besides, teal hair makes it less feminine, right?


The apples snap on and off and store in the pocket. What do all trees need? An owl hole of course.


Visit: tatertotsandjello.com for the weekend wrap up party!"


Thursday, February 17, 2011

Quiet Book Pages

 My pet project right now is a quiet book for my son's 2nd birthday. I read that it's super time consuming, but it's really not been that bad. I've really been enjoying coming up with different ideas for pages and making patterns for them. Here are some of the pages I have completed so far. Notice that the edges are still rough. They will be finished when I bind the book.


       The door opens, letters slide inside the box, and the flag goes up and down. I think I might sew a button on the door as a door pull. I think it looks a little naked right now.
                                      

This page is made of an up-cycled pair of baby girl's pants. I intend to put a few goodies in the pockets, including a pad of paper and pencil to write letters to "send" in the mail.


The W isn't crooked- I promise.

This z page has the zipper of course, and also the snap closure (it's a faux button), plus the pocket on the pants. In order to attempt to keep the pieces of this book together, I made the pants on this page into a giant pocket that can be accessed at the waist band. 


I've already shared the H page, but I finished the inside last night. I added the plastic sleeve on the base heart to hold a family picture. The top is open so the picture can be changed over time.

That's all for now. I'll share more pages tomorrow.
Visit tatertotsandjello.com for the weekend wrap up party!

Thursday, February 10, 2011

Sew-Along week 2

Photobucket


Week 2 of the Sew-Along is here, and this week's project is either pajamas or something V-day related. I'm big on practical projects, so I made a quiet book page that is kind of V-day related.


The skills this page works on are hand-eye coordination and fine motor skills. The heart flaps lift up and inside I intend to put a picture of my husband and I, but I didn't have one handy that's the right size.


I started sewing the one on the right first, but it turned out horrible (as you can see), so I did another one.  I've never sewn knit before, and I was getting way too close to the edges. I got the idea for this page from another blog, I'm sorry I don't remember which. If it was your idea, let me know and I'd be glad to give you credit. :) Everything for this page was on hand except for the muslin and the felt letter H- both of which I bought for this quiet book project. The pink fabric and ribbon were both upcycled, and the lock originally came with my gym bag. The package of felt letters/numbers were on clearance at Michaels.

Friday, February 4, 2011

Crafty Sewing Mamas' Sewalong Kickoff

Photobucket


Hi everyone. I am a member of a community on http://www.babycenter.com/ called Crafty Sewing Mamas! and a bunch of us are doing a weekly Sew-along  challenge in our blogs to try to motivate us to get some sewing projects done. I've really been slacking in the sewing department since Halloween. I got a new machine for Christmas to replace my sad broken one, and until today it has remained in its box. Woops! It is in its box no more! The first project was either a sewing machine cover or a crochet needle case.  Here's my cover.


The fabric is darker irl. It's part of a very lightweight shawl that I bought on our honeymoon. I always loved the fabric, but haven't had many opportunities or outfits to wear it with. Now I get to look at it every day and put it to use. :)

As a bonus, here's a little finger puppet my babysitting charge and I made last week. It's a cat- clearly.


Friday, November 5, 2010

Handmade Halloween

The final costume
Cost: $ 6.97
hat fabric -free, left over from culinary school
buttons- on hand
red fabric- 99 cents (with 85% remaining for future project)
sweater for pants- 3.99 (with the entire torso left for another project)
onesie-1.99 (easy to remove buttons and use later)

Friday, October 29, 2010

Wrist Pin Cushion

I've been using the original packaging to store my pins in, but it isn't very convenient and Mr. Grabby Hands was dying to get ahold of it, so I whipped this up.


It was really simple to make. I just used a plastic kid's plate as a template, cut out the circle, gathered it, stuffed it with cotton batting and fabric scraps, then sewed it closed. I made a quick tube for the wrist part, fed elastic through, attached it, and voila! Quick and easy.

Total cost: zero

I found the pink bandana I used as fabric in my misc. art crap bin, I had elastic on hand from my diaper customizing, and I used fabric scraps and batting I had leftover from my fabric block project.

Thursday, October 28, 2010

15 Minute Upcycled Longies

My 15 minute Longie pants tute:

Step 1: Find a 100% wool sweater at the G-Dub

Step 2: Mutter and grumble about how all the sweaters are acrylic now-a-days. Ask your child "Doesn't anyone use real wool anymore?" as he stares blankly at you.

Step 3: Cut off the arms of the sweater at the shoulder seam, leaving the wrist cuffs intact. Keep the torso of the sweater for another project.

Step 4: Use a good-fitting pair of pants to determine the length and rise, then trim the crotch to shape, leaving a seam allowance. The arms don't appear to be wide enough in this pic, but the sweatpants don't stretch, and the wool pants will.


Step 5: Turn one sleeve inside out and slide the right-side-out sleeve inside the inside-out sleeve, lining up the crotch. Turning only the one outer sleeve inside out will ensure that you have right sides facing each other. Pin along the semi-circle/crotch.

Step 6: Sew along the semi-circle, then pull the leg out.
Step 7: Measure out elastic for the waist
Step 8: Fold down waist leaving a tube for elastic. Sew 1/2 way around the waist, run out of thread on your bobbin, rethread, and get distracted by House MD on tv.
Step 9: Focus! Almost done! Sew the rest of the way around the waist band leaving a small opening to thread the elastic
Step 10: Thread elastic through, sew the ends together, and finish off the seam.
Step 11: Turn right-side-out and marvel at how handy you have become!

Optional Step: Sew patches on the knees for your crawler. I didn't get there yet.
For cloth diaper longies: Lanolize these, air dry, and they will double as a cloth diaper cover and pants. Yay multi-purpose!

Action shots:
See the nice built-in cuffs? Lovely.

Linked up @